Author: David Busch
Photography Myths: Part 1
Myths:
“I can take photos hand-held at 1/30th second!”
“To ensure sharpness, shoot at the reciprocal of your focal length; i.e. 1/200th second for a 200mm lens.”
“When shooting action, use a fast shutter speed to freeze the motion.”
Truth: You probably don’t look close enough to see how much sharpness is lost to camera motion blur, and the reciprocal rule’s value can vary dramatically from individual to individual. When taking action photos, using a shutter speed that’s too fast can ruin your picture.
Taming motion blur is actually one of the easiest ways to improve the sharpness of your images, and also the one that’s easiest to neglect. Photographers upgrade to higher-resolution cameras to get better photos, buy the best-quality lenses to converge the sharpest possible images onto the sensor, and focus with utmost precision, only to lose detail to motion blur. Some even brag that they are able to capture images handheld at remarkably low shutter speeds, not realizing that those shots at 1/15th second, while acceptable, aren’t as good as they might have been. Taking and partially releasing deep breaths, special bracing techniques, and a gentle finger on the shutter release can help, but they can’t replace other methods for reducing camera motion, and, of course, do nothing at all when your subject is moving faster than your shutter speed can freeze.
Subject motion is one sharpness-robber that has an easy set of cures, assuming that you want to freeze the action. Either reduce the apparent speed of your subject relative to your frame (e.g. pan, or have the subject moving toward you) or increase the shutter speed sufficiently to stop the motion. Most digital SLRs have shutter speeds of at least 1/4000th second; some top out at 1/8000th second. Either speed should be enough to stop virtually any action this side of a speeding bullet. Your only challenge is making sure you have enough light to allow using one of these tiny time slices at a reasonable ISO setting. When the available light is insufficient, electronic flash units have even more action-stopping power; the duration of some of them can be 1/50,000th second or briefer.
But don’t over-use fast shutter speeds. We’ve all seen photos of race cars or motorbikes that appear to be parked and immobile on the highway, or helicopters that seem to be on the verge of crashing because their rotors are stopped in mid-spin. Part of the creativity of action photography comes from experimenting to find a shutter speed that will allow wheels, propellers, and rocks kicked up by a speeding vehicle to blur realistically.
Blur caused by the camera, however, is almost always a bad thing. There are many elements involved other than the photographer’s shaky hand, too. Some recent cameras have added so-called electronic shutters that eliminate the blur caused by the camera’s front/first shutter curtain opening at the beginning of an exposure. Mirror lockup and delayed shutter features can help prevent internal vibrations that can affect both hand-held and tripod-mounted photography. Image stabilization can shift the position of the sensor or elements within the lens (or the pixels of the image itself in the case of electronic stabilization) to counter camera motion.
But the primary cause of camera motion blur still resides in the hands of the photographer. Most people find to their astonishment that, in a formal test and under close examination, their handheld photos with wide-angle or normal lenses at 1/500th second are significantly sharper than those taken at 1/125th second. Those they snap off at 1/30th second aren’t nearly as tack sharp as they’d been boasting when you peep the pixels. What looks pretty good at normal enlargement and viewing distances turns out to be not so good when you isolate your subject matter so the blur can be seen more easily, and examine the results up close. If you’re truly committed to raising the bar on your image quality, you might be making some changes in how you shoot after you try my sure-fire blur tester to see for yourself.
The first step is to build yourself a blur tester. I like to use a large piece of aluminum. You can use a scrap panel of aluminum, sacrifice a cookie sheet, or use a serving tray like I did. Take the sheet and poke a series of tiny pinholes in it, as perfectly round as you can make them. Although the size of the holes isn’t crucial, smaller is better; anything one-eighth inch or smaller should work. The most important thing is to have clean, perfectly round holes so you’ll be able to detect any deformation caused by camera shake.
Array the holes in a pattern resembling a plus sign, with intersecting vertical and horizontal arms. In a pinch you can use aluminum foil, although it’s more difficult to create perfectly round holes in foil because it tends to tear. If necessary, file way any burrs that result when you poke through the sheet. Remember, you want nice circular holes.
If you want to get fancy, you can spray paint the sheet with flat black paint to increase the contrast between the sheet itself and the light coming through the holes. After the paint dries, clean out any paint that goes into the holes. Painting is not really necessary if you conduct the test in a darkened room. Now you’re ready for your test.
- Mount the sheet vertically, perpendicular to the ground
- Point a strong light at the back of the sheet, illuminating the pinholes. Make sure no light spills over beyond the sheet itself, as excess light could cause flare in the test shots.
Position yourself far enough from the sheet that you can fill the frame with the sheet. - Focus very carefully on the sheet, using manual focus. Your autofocus system might not work well in this situation. Use the pinpoints of light as your focus point, and turn the focus ring until the points are as sharp as possible.
- Take a few shots using manual exposure until you find out which f-stop will give you a good exposure. Try to use f/8 to f/11 so your lens will be at a relatively sharp aperture. Although exposure isn’t super critical, you don’t want to overexpose and cause the pinholes to enlarge too much from blooming. You want tight, round dots of light.
- Take several pictures at each shutter speed you want to test.
- When you’re done, examine your shots. As you reduce the shutter speed, you’ll probably notice that the pin circles become elongated in the vertical, horizontal, or diagonal directions, depending on the bias of your shakiness. At worst, you may notice little wavering trails of light that show you’re not merely shaking a bit, but positively quivering.
The shape of the holes that you photograph will reveal the amount of camera shake at any tested shutter speed. Sometimes, just making a few adjustments in how you take pictures can help reduce camera shake. The biggest and most common offense is punching the shutter release. Beginners do this all the time as a matter of course; I’ve taken a photo with a simple point-and-shoot camera, handed the camera to a friend who then fired off a shot using the same settings. My picture turned out relatively sharp, while the friend’s was egregiously blurry. I’m no paragon of hand-holding steadiness, but I know enough to wait until the camera has stopped moving when I bring it to my eye, and then squeeze off a shot gently.
I’ve seen amateurs flip their camera up and shoot in a single motion. Because some cameras don’t have an eye-level viewfinder, they may hold the camera at arm’s length to frame using the LCD. That’s a perfect recipe for camera shake! Yet, even more experienced photographers are prone to bad shooting habits like these when they’re in a hurry or a photo opportunity presents itself without warning. Impromptu grab shots are especially dangerous because you may not even have time to notice what shutter speed the camera is using before taking the photo.
Even the most careless among us are a bit more careful when we know the shutter speed is set to 1/60th second than when it’s 1/500th second. If you take an extra half-second before shooting, you can improve your odds of getting a sharp shot significantly. Modern cameras that lock focus and exposure when the shutter release is depressed halfway have actually helped improve sharpness, because more of us are now gently releasing the shutter after that initial half-press.
As you can see, the reason why the reciprocal rule should be used only as a starting point is that a usable hand-held shutter speed depends greatly on the intended use for an image, and the photographer’s technique. You’re probably better off reducing the recommended speed – use 1/200th second with a 100mm lens, or 1/2000th second with a front-heavy 500mm telephoto lens – and even then consider using a tripod.
Deflating the ‘Eggs in One Basket’ Myth
I’m currently in the process of upgrading my memory cards to Lexar 128GB 1000X/150 MB/s cards, as they are on sale for about $60 each in packs of two. I do this quite often (my last stop was in 64GB territory), and I’m always reminded of the “Eggs in One Basket” myth that has dogged incremental memory expansion for the last several decades. The debate about whether it’s better to use one large memory card or several smaller ones has been going on since even before there were memory cards!
I can remember when computer users wondered whether it was smarter to install a pair of 200MB (not gigabyte) hard drives in their computer, or if they should go for one of those new-fangled 500MB models. By the same token, a few years ago the user groups were full of proponents who insisted that you ought to use 128MB memory cards rather than the huge 512MB versions. Today, most of the arguments involve 16GB cards vs. 32GB cards, and with dropping prices, 64GB and 128GB cards have found their way into the debate as well.
I have some professional photographer friends who chortle at the folly of using large memory cards (I’ve actually witnessed the chortling), and they have special reasons for their preference. But most of us have no cause to fear using mature memory storage technologies. I don’t want to be a pioneer in working with 512GB memory cards (and have no need to do so), but I’m perfectly comfortable with my 128GB cards for the following reasons.
1. Memory cards don’t magically wait until they are full before they fail. You will not automatically lose 128GB worth of photos, rather than 32GB if a memory card implodes. If you typically shoot 6GB worth of images before you have a chance to copy them to your computer or laptop, then that’s the most you are at risk for under average circumstances. Whether you’re using an 8GB, 16GB, or 128GB card, the amount of images you shoot in a typical session will be the number you actually lose. All a larger memory card does is give you greater flexibility for those times when you want to shoot more in one session and don’t want or don’t have time to swap cards. Many photographers change cards when they are 80 percent full to avoid missing a crucial shot. A larger card helps you stretch that a bit.
The biggest danger comes from waiting too long – say several days – to back up your images. We all know photographers who have New Years Eve, July 4, and Thanksgiving images on a single card, and who never backup their photos.
2. 64GB cards aren’t twice as likely to fail as 32GB cards, although many seem to feel that’s so. Indeed, I’ve heard the same advice to use “safer” 256MB cards, 2 GB cards, or 4GB cards virtually up the line as capacities have increased.
3. Using multiple smaller cards may increase your odds of losing photos. Memory cards do fail, but that usually happens from user error. The first 128GB card I bought, a Sony model, failed within a few months, because I put it in my wallet for “safekeeping” and accidentally folded it in half. It’s also common for photographers to lose cards, put them through a wash and dry cycle, or perform other atrocities unrelated to the reliability of the card itself.
Yes, if you use smaller cards you may lose half as many photos, but you might also find that more cards equates to a higher risk of losing one or damaging one through stupidity. I find it’s better to use the minimum number of photo “baskets” and then make sure nothing happens to that basket. If all your images are important, the fact that you’ve lost 100 of them rather than 200 pictures isn’t very comforting.
4. When your family goes on vacation, do you split up family members to travel in several smaller cars? After all, in a terrible collision, you might lose only a couple of your kinfolk rather than all of them. Keep in mind that your family is much more important to you than your photos, and the odds of being in a traffic accident is much greater than encountering a faulty memory card. Humans are susceptible to the cognitive fallacy “neglect of probability.” I’ve taken hundreds of thousands of pictures and lost two memory cards, and I know three other photographers who’ve had memory card problems. I’ve driven hundreds of thousands of miles and been in four traffic accidents and know a dozen people who have had auto mishaps. Should my family be riding around in different cars while I stick to 16GB memory cards?
5. The typical memory card is rated for a Mean Time Between Failures of 1,000,000 hours of use. That’s constant use 24/7 for more than 100 years! According to the manufacturers, they are good for 10,000 insertions in your camera, and should be able to retain their data (and that’s without an external power source) for something on the order of 11 years. Of course, with the millions of cards in use, there are bound to be a few lemons here or there.
So, what can you do? Here are some options for preventing loss of valuable images:
Interleaving. One option is to interleave your shots. Say you don’t shoot weddings, but you do go on vacation from time to time. Take 50 or so pictures on one card, or whatever number of images might fill about 25 percent of its capacity. Then, replace it with a different card and shoot about 25 percent of that card’s available space. Repeat these steps with diligence (you’d have to be determined to go through this inconvenience), and, if you use four or more memory cards you’ll find your pictures from each location scattered among the different memory cards. If you lose or damage one, you’ll still have some pictures from all the various stops on your trip on the other cards. That’s more work than I like to do (I usually tote around a portable hard disk and copy the files to the drive as I go), but it’s an option.
Transmit your images. Another option is to transmit your images, as they are shot, over a network to your laptop or smart device. Many cameras have that option.
External backup. It’s easy to physically transfer your images to a laptop, smart device, or other backup storage, particularly when you’re on vacation.
Be smart. If you’re having problems, the first thing you should do is stop using that memory card. Don’t take any more pictures. Don’t do anything with the card until you’ve figured out what’s wrong. Your second line of defense (your first line is to be sufficiently careful with your cards that you avoid problems in the first place) is to do no harm that hasn’t already been done. If necessary, decide on a course of action (such as using a data recovery service or software) before you risk damaging the data on your card further. If you take a picture of your business card as the first photo in a session, should the card be lost your odds of having it returned to you are increased.
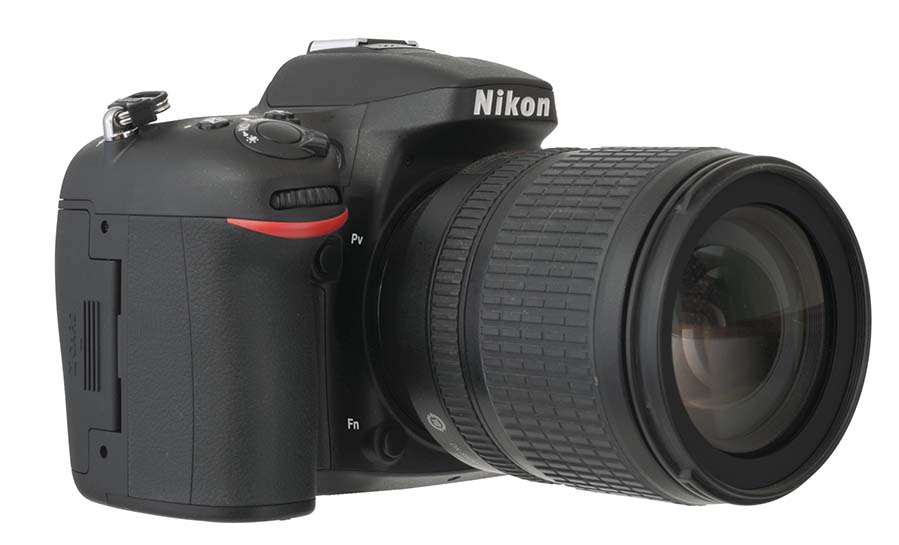
Why I favor the D4s and 70-200mm VR I for Concerts

Reverend Peyton
Capture of Rev. Peyton, 1/160s, handheld, f/4, ISO 6400, 200mm focal length.
This camera/lens are my go-to combo for concerts, ballet, plays, and other typically low-light, action-packed subjects. I routinely shoot an entire performance at 1/160th-1/200th second at f/2.8 to f/4, using ISO settings of 6400-12,800 (except when shooting multiple exposures and intentionally blurry images.) I’m still amazed at the sharpness of the 70-200mm lens wide open. And, because it doesn’t exhibit focus breathing like its “replacement,” I get a 200mm equivalent field of view, rather than 135mm, when the lens is cranked all the way out.
The image quality of the D4s at ISO 12,800 and even higher is superb, even under very contrasty lighting conditions. Vibration reduction lets me shoot at 1/160s. The only time I use another camera/lens combination is with artists that prohibit “professional-looking” cameras while tolerating everybody else. In those cases, I’ve had good luck with a Nikon Df or a mirrorless camera.
—
The new DX cameras are here…what’s next?
 People prematurely predicted the arrival of the D7200 for about 18 months, starting about a year after the D7100 was introduced. It was supposed to appear in September 2013, February 2014, and then “for sure” at Photokina in September 2014. They’ve been telling people to wait for the D7200 for so long, that it actually came to pass on March 2, 2015. I love the camera, and have finished a book about it. Now it’s up to the publisher to get that thing on the shelves. I’ve also written a book about the new Nikon D5500, which, like the D7200 is basically an updating of the previous model with some tasty new features. I’ll be posting about those soon.
But many are asking whether the D7200 is really the replacement for the ancient Nikon D300s. Indeed, a high-end DX camera to replace the D300s, currently dubbed the D9300 has been predicted by those who thrive on the rumor mills for some time. So, are there any more new Nikon DX cameras in the offing?
The first thing to keep in mind is that those who know aren’t saying anything, and those who most avidly repeat the rumors don’t know anything. Nobody who depends on the information they receive through non-disclosure agreements would risk their livelihoods by leaking information. There are only two kinds of true rumors. The first type includes those deliberately leaked by the vendor roughly two weeks before actual product introduction in order to stir up excitement. Those rumors will almost never appear far in advance. (Google “Osborne Effect” is you wonder why.) The second type of true rumor usually comes from idiot workers at vendor design or assembly facilities, generally closet fanboys who choose to put their jobs in danger in order to feel more important. The problem with these is they are difficult to discern from the rumors that are fabricated out of whole cloth and have no basis in truth. True rumors will never surface from those testing prototype equipment, from vendor reps (who are usually briefed a couple weeks ahead of time, and in the dark until then) or, *least of all* from local camera stores, who generally are the last to know.
However, you can make educated guesses, the same as anyone else, based on information at hand. No surprises: in looking at the holes in Nikon’s lineup, a more upscale D9300 for around $1400-$1700 is needed just as urgently as the D7200 that we have. Make no mistake: DX cameras are very popular among advanced and pro shooters who need a rugged, feature-rich body, and there is room for improvement beyond what we have with the D7200. Nikon currently offers a “low end” FX camera, the D610, and a more advanced FX model, the D750. If the D7200 is the equivalent of the D610 in the DX arena, where is the DX version of the D750?
Indeed, there is currently no advanced DX camera beyond the D7200, and Nikon must fill that need, unless they are trying to push enthusiasts into the full frame realm (and thus force them to buy FX lenses.) That’s actually a viable scenario: Assume that potential buyers of a flagship DX camera would find switching to FX and buying new lenses acceptable. After all, such enthusiasts may already have been stocking up on FX lenses in anticipation of such a move, or simply because there is no DX equivalent of lenses like the Nikon 70-200mm f/2.8 zoom. The Nikon 70-200 f/4 model is more reasonably priced, but it’s still an FX lens. FX bodies have long been seen as the “ultimate” advanced amateur/pro equipment. Given those circumstances, the existing D7200 and future replacements may be sufficient flagship models for the DX line.
On the other hand, those who shoot sports or wildlife photography, rather than landscapes or architecture, may value the reduced field-of-view of the DX format. They very well could be looking for a higher-end DX model with enhanced features, even if it overlaps in price with the low-end FX bodies. So, using this reasoning, if a D300s replacement is actually introduced soon, I’d expect it to be a more feature rich model with a 24MP sensor. Cramming more megapixels into an APS-C-sized sensor is probably too tough, especially in terms of the higher ISO performance that pro/semi-pro users will demand. The D7200 already has Nikon’s 24MP DX sensor with no OLP filter and decent continuous speed. To justify a more advanced model, they’d need something on the order of a new sensor with even better low light performance, and enhanced EXPEED processor (perhaps two of them) for faster handling of the images, and possibly a swiveling screen like the one found in the D750. Nikon would have to include Wi-Fi, a faster frame rate, maybe 4K video, and some other goodies to justify a $400-$500 price differential with the D7200.
Regardless of which of the logical scenarios come to pass, at least a little more waiting will be required. Nikon’s latest financials (with sales down another 15 percent) probably have made the company a little cautious about overextending itself. Unlike Canon and Sony, Nikon doesn’t have profits from copiers, printers, televisions, and blockbuster movies to fall back on. Buying a D7200 now might be a good idea if you have no need for the expected upgraded features. If price is a consideration, waiting and buying a D7100 at a lower price now that it has been replaced would be wise. And if a D300s replacement is right up your alley, you’ll want to hang in there until it appears.